Data format and bleed
I can only order portrait sizes, but I need my product in landscape size. Where do I align the pages? Open
Please first of all, check once more if there is really no suitable alignment available in the configurator. The following…
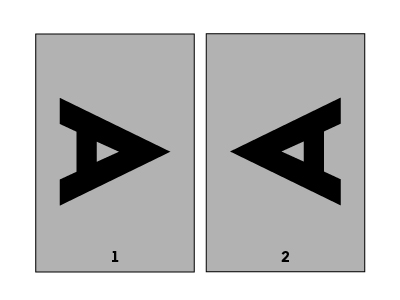
Please first of all, check once more if there is really no suitable alignment available in the configurator. The following approach should only be necessary in exceptional cases:
The key point is “head-to-head”. If the head of the design is seen on the first page on the right, it must be seen on its back page on the left. If front and back pages are shown side by side in the chosen alignment, they are positioned head-to-head and will be correctly printed.

How do I find the bleed or safety distance in the data sheet? Open
The safety distance is measured from the finished format inwards and sets the requirement of how near you can place…
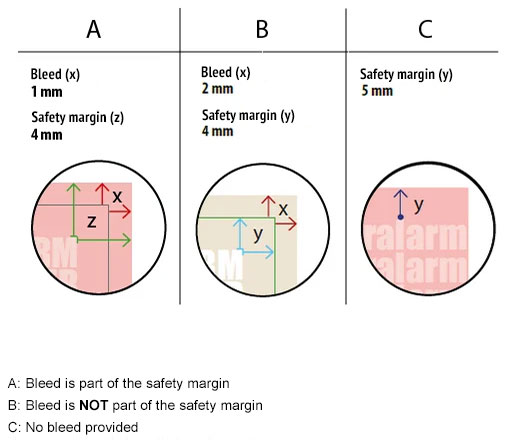
The safety distance is measured from the finished format inwards and sets the requirement of how near you can place important elements. The bleed is measured to the exterior and can be used to overfill colour areas beyond the edges. Attention: In some data sheets there is no bleed or it is already part of the safety distance!

How are the dimensions of a PDF file defined? Open
Important: trim box, bleed box, PDF/X-3:2002 A PDF file can contain different page boxes. These are the media box, crop…

Important: trim box, bleed box, PDF/X-3:2002
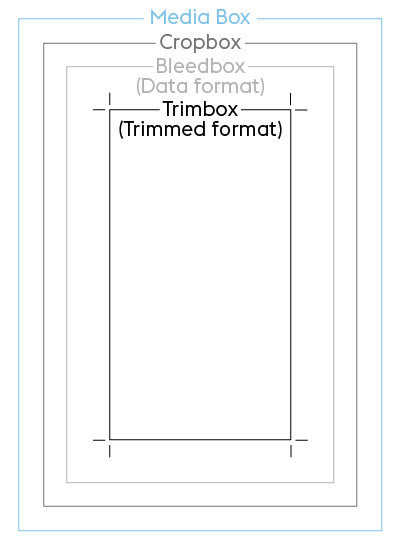
A PDF file can contain different page boxes. These are the media box, crop box, bleed box (=file format) and trim box (=finished size). The bleed box and trim box are mandatory components of the PDF/X-3:2002 standard, which we require for print files. The trim box ensures that the file is correctly placed.
Mediabox
This defines the dimensions of the output medium and the media frame of the PDF document. At this stage the document is not yet cut and generally contains the PostScript page dimensions configured in the PDF generator. The media box is automatically the largest of all of the boxes since it encompasses all other boxes listed below. When creating your print files, you should ensure that the crop box and bleed box are the same size as the media box.
Cropbox
The crop box (also known as the screen region in Adobe Acrobat) describes the region of a PDF page that is output on the screen or by the printer. By default it is set to the same dimensions as the media box.
Bleed box (file format)
The bleed box region contains information about the cut region that defines the size of the finished format plus the specified bleed area. At FLYERALARM a 1 mm bleed on each side is normally required. You can always find the individual requirements in the data sheet.
Example: A 1 mm bleed must be added on all sides of a DIN A4 (21 x 29.7 cm) page, resulting in a width of 21.2 cm (21 cm + 2 mm) and a length of 29.9 cm (29.7 cm + 2 mm). These are the dimensions that must be configured for the bleed box. By default it is set to the same dimensions as the crop box.
Trimbox (same as the FLYERALARM finished size)
The trim box defines the finished size of the print product after trimming – i.e. what you hold in your hand at the end of the print process.
How do I correctly choose the file format and bleed in my print file? Open
Please create your print file using the exact specifications from the data sheet. This contains parameters specific to the product…
Please create your print file using the exact specifications from the data sheet. This contains parameters specific to the product concerned, such as safety distance and bleed.
The file size matches the size of the finished product plus the bleed and is always dependant on the respective product.
The bleed is the area of the print file that extends beyond the finished size. The bleed exists to make sure that surfaces and photos, which should be visible up to the edge are really printed until the edge. This way, there are no white streaks or edges, even if the material is not 100 % precisely cut off. The bleed is printed beyond the finished size and then cut. The print files should therefore be bigger and bled-off elements should be expanded to the bleed.
The safety margin is an area within the finished size that should generally not contain any design elements. This is to avoid any elements being cut off partially or completely when cutting the print product.
For elements that are to be printed up to the edge, the safety distance does not need to be observed.

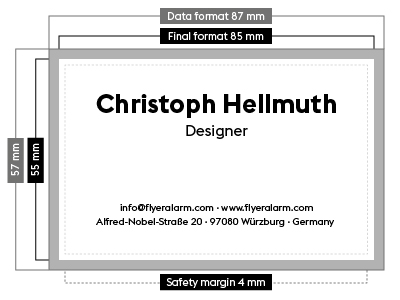
This example relates to a business card with a finished size of 8.5 x 5.5 cm. A bleed of 1 mm per side is added to the file. This means that the file dimensions are 8.7 x 5.7 cm. Please also note the product-specific safety distance for texts and objects from the edge of the file. In this example, these are 4 mm from the edge of the file format.
Printers’ marks
Please do not create any printers’ marks such as folding, trim, punching or cutting marks in your file – they will be printed along with the artwork.
Page alignment and sequence
Is everything in the correct location? Always check the alignment (portrait or landscape format) of your design and that any multi-page products have the pages in the correct order. Additional product-specific information can be found in the relevant data sheet.


